Freeze the Linux Production Image Build - Yocto
Get a snapshot of the product Yocto build system, which can be used to build the same production image in the future and rebuild the exact same production binary.
11/22/20238 min read


Why ?
Every software or hardware engineer engages in the process of releasing as part of their daily routine. The nature of what we release is contingent upon the specific domain we specialize in. For those involved in software development, the release typically involves a binary, with the corresponding source code tagged under the same version in the version control system, such as Git. If you wish to replicate the same image from the sources, you can simply check out the tag and initiate the build process. It's a straightforward procedure.
However, when dealing with an Embedded Linux image, things take a different turn. An Embedded Linux Image, in this context, is defined as a singular file comprising various components. These components include the Bootloader, Kernel, Rootfile System, third-party frameworks, and other partitions or sections tailored to meet the system requirements. Returning to our discussion, the creation of an Embedded Linux Image involves the use of different build systems based on the specific circumstances.
Consider a scenario where the reference board design employed for the product has abundant documentation on buildroot-based projects. Consequently, developers often adopt buildroot as the foundation and implement customizations on top of it. Nevertheless, the Yocto build system stands out as the most widely utilized Embedded Linux build system today. Its popularity is attributed to its flexibility, extensive community support, comprehensive documentation, and vendor backing, making it a preferred choice for those immersed in the Embedded Linux domain.
In this context, our focus is on Linux images based on the Yocto project. If you happen to use a different build system for your image creation, please mention it in the comments, and I will provide you with an available writeup or guideline on how to freeze your build using that specific system.
What ?
To freeze your source where the build is done using Yocto, a fundamental understanding of the Yocto project's basic architecture is necessary. In Yocto, Poky is utilized as the base distribution, encompassing a specific set of metadata, tools, open embedded core, and bitbake.
Metadata
Now, let's pinpoint the initial component requiring complete control, known as metadata. Yocto generates outputs based on this metadata, and it's stored in meta-layers. Consequently, the final image relies on these meta-layers, which need to be moved to your domain.
Downloads
Moving on, the next crucial component is the external repositories employed in the build process. Hold on! If that sounds confusing, allow me to clarify with an example recipe. This should shed light on how to transfer these repositories to a private repository, ensuring a smoother understanding.
In the world of Yocto, nearly every recipe produces an output, recognized as a package. An Embedded Linux Image, a result of a recipe, is essentially a compilation of these packages. This implies you can construct a recipe by gathering outputs from other recipes. Additionally, each recipe involves inputs; these can be local resources, remote sources, or a combination of both.
Our primary focus is on remote resources that recipes utilize as inputs. These resources could take the form of a tarball, a Git repository, a single file, and so on. Before the package is compiled, the recipe retrieves these resources from the remote source, and they are stored in the downloads folder. I'll delve into the location and additional details about this folder later, but it's crucial to understand now that the downloads folder must be within our control; otherwise, the build relies on external resources.
Special Repositories
The third component is not universal for every scenario. Certain repositories require cloning before building the image and configuring the path. The recipe then utilizes this pre-fetched repository as a local resource. If your build system includes such repositories, it's essential to move them to your own Git cloud.
How ?
Now you have an idea of what components we should migrate to our territory in order to freeze the Linux Image build.
Metadata
Downloads
External repositories
From here onwards, I will get an example project to explain how to implement the previously discussed steps. This project is for FX30 LoRa Gateway which is from Sierra Wireless.
The below image shows the folder structure of the workspace of this device build system,
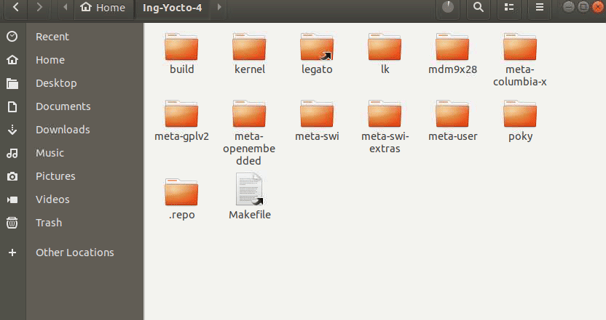
Let me explain briefly about the folders shown here. Before that, I want to add a note, in this example project, I am migrating the repositories to bitbucket. Bitbucket is only one option we can use and there are many other clouds that you can use. Ex: Git Hub, Git Lab ... etc.
"poky" is the core of your build and it has base metadata, required tools, and the open embedded core. Generally, poky is cloned from the third-party repository. We should migrate it to our bitbucket (Or github).
"meta-user" is a meta layer that I have added with some modifications to the image. Generally, a meta layer or layers added by the user will be used to customize the image as per our requirement and maintain the source in a private cloud. In this case, it is already in my bitbucket.
All the other "meta" layers are the metadata that is used by the build system during the build. Those are repositories maintained by third parties (vendor, community-funded organization ... etc). Those should need to be migrated to the bitbucket repositories.
Migrating metadata
In this example, the below folders can be identified as metadata.
poky
meta-openembedded
meta-gplv2
meta-swi
meta-swi-extras
meta-columbia-x
meta-user
Out of the above metadata repositories, meta-user is already in the private repository which I have control of the cloud.
To migrate the rest of the meta layers, I have followed the below steps. Here I am demonstrating the steps for one meta layer, which you can follow for all.
Change the directory
$ cd Ing-Yocto-4/poky
git check remote URLs
$ git remote -v
legato-github https://github.com/legatoproject/poky (fetch)
legato-github https://github.com/legatoproject/poky (push)
Clone a bare repository of the poky repository to tmp folder
$ cd /tmp
$ git clone --bare https://github.com/legatoproject/poky
Create the repository in your private cloud to maintain the repository In my case, it is bitbucket and I have created a repository named poky without adding a readme or gitignore files in it. Once the repo is created using bit bitbucket, you can get the remote URL of this repository, which will be used in the below step.
Pushes the mirror to the new GitHub repository
$ cd poky.git
$ git push --mirror <your-repository-URL>
Remove temporary repository
$ cd ..
$ rm poky.git
Migrating download folder
The download folder is created during the first build, depending on the path you specified in the "local.conf" file. The default location for the downloads folder is "build/downloads", Here I assume the downloads folder is in the default path. And if I specify the downloads folder below, that means I am referring to the same downloads folder, which I mentioned here.
The path can be easily changed, "local.conf" file updating the below line
DL_DIR ?= "Path to your downloads folder"
To enable downloaded git repos as tarballs, another configuration should be set in "local.conf" which is
BB_GENERATE_MIRROR_TARBALLS = "1"
After configuring the above in local.conf, you can start the first build for your image and the completed build, you should see, the generated tarballs in your downloads folder along with some other folders. The repositories are fetched to <path to downloads directory>/git2 or <path to downloads directory>/svn folders and then compressed into the downloads folder.
To freeze your downloads folder, the git2 or svn folders are redundant and use more space, those should be deleted.
$ rm -rf ./downloads/git2
$ rm -rf ./downloads/svn
After you remove the git2 and svn directories, the same steps can be followed to push the downloads folder to the Bitbucket repository. Depending on your requirement this can be either FTP, Google Drive location, or any storage which you have control over. Depending on your choice, the steps I mentioned for rebuilding the image from the frozen repositories might have to be modified, but for GitHub, GitLab, and Bitbucket the steps would be similar.
Create a repository in bitbucket without a readme or ".gitignore" files, and navigate to the downloads folder. Initialize the folder as git repository.
$ git init
Configure the remote as below
$ git remote set-url origin <use the URL from the bitbucket repository>
Create a branch as your branching practice, for easiness of explanation in other steps, I have set this branch as "build_0101"
$ git branch "build_0101"
Add all your compressed files to the downloads folder
$ git add <all compressed files in download folder>
Here you can add files by those file extensions or you can add using the -A option.
Ex tar.gz
Push changes to your repository
$ git push origin build_0101
Once all the files are pushed to your repository, you are halfway through the process. In case you failed to push changes to the repository, because of the size limitations. You can try alternative methods like adding files through different commits ... etc.
Migrating Special Repositories
In this project, there are a couple of directories that are used as local repositories and dependencies in my case, which will not be most of the cases. If you have this kind of repositories, those also need to be migrated to your version-controlling platform.
In my case, the below directories have to be migrated.
kernel
legato
lk
mdm9x28
The steps you need to follow are pretty much the same as for the meta layers. You have to create the repository in your version-controlling platform and use it to push these local repos to your remote repository. In case, the directory is not a repository, then you have to initialize the directory as a git repository and add and commit those files before pushing them to the cloud as we did for the downloads folder.
Rebuilding the image from private sources
Once all the repositories are migrated to a private repo, you can clone these separately to your working directory and initiate the build after modifying the build configurations to disable fetching from through the third-party repositories.
Update the download path, here you have to update it to the path of the directory you have cloned the downloads repository. And make sure it is in the correct branch and the revision.
DL_DIR ?= "Path to your downloads folder"
Disable internet access
BB_NO_NETWORK = "1"
Next is to change the recipes which could trigger errors. These errors are triggered by the recipes, which use SRC_REV as ${AUTOREV}, Once you disable the network, these recipes give an error when trying to check the latest revision on its remote server. To fix those errors you have to find the packages you used in your image, and if they use AUTOREV, it should be updated to the revision you used. To easily find the packages, you can initiate the image build and find the packages that trigger the error.
The SRCREV of these packages can directly modify the metadata or change it on local.conf configuration file.
In my case, those have been added to the local.conf file as below.
SRCREV_pn-<your-package-name> = "<your commit ID>"
Run the build after sourcing the environment as you follow in order to build your image.
You can redo this and create the same image in the future without any dependencies on external repositories. Please note that Yocto has some dependencies over the Ubuntu version you used. So please add the version of Ubuntu you used in your build server.
Repo Tool and Manifest.xml
Pulling each repository manually is not feasible at all times, when the number of repositories is high, the manual process could be far more difficult and erroneous. To avoid that, the "repo" tool is used with manifest.xml files. I will explain the way to keep track of the repositories and the revisions on these manifest.xml files in another writeup.
Get in touch